
The PIM Playbook for Securing Global Admin
Nobody should have standing Global Administrator; It’s an age-old principle (the principle of least privilege, that is).
One approach is to use a separate, dedicated account for “admin things”. That’s one way, but it’s not a great way.
Just like in Linux, you don’t log in as root (…right?) - you sudo the commands you need.
In Entra, you shouldn’t log in as a Global Admin. You should activate Global Admin.
So how do we do it? Privileged Identity Management (PIM) provides time-based and approval-based role activation to mitigate the risks of excessive, unnecessary, or misused access permissions.
At a high level, here’s what we’re going to do:
Require a user to authenticate with a passkey in order to request to activate the Global administrator role; the request will then need to be approved by another admin.
To fully utilize all of the protection that PIM has to offer though, we need to first take a step back and configure some prerequisites:
Passkeys
Assignment Group
Authentication Context
Conditional Access Policy
If you haven’t enabled passkeys in your tenant, you can refer to my previous post to get you started
How to enable passkeys in your Microsoft 365 tenant — Olympic Security.
Assignment Group
Create a new Security group, ensuring to toggle the “Microsoft Entra roles can be assigned to the group” setting to Yes. I like to append [Role] to all of my role-assignable groups to easily identify them at a glance.
This group will be used in three places in the following steps.
Reference: Use Microsoft Entra groups to manage role assignments
Authentication Context
Starting from Entra, go to Entra ID > Conditional Access > Authentication contexts and click + New authentication context. Name it something like “Passkey”, check the Publish to apps box, and remember to hit Save at the bottom.
Conditional Access Policy
Still in Condition Access, click Policies, then + New policy
Give it a name like “Require Passkey for GA Activation”
Assignments: the Global Admin [Role] group from earlier
Target resources: Authentication context, select “Passkey”
Grant: Require authentication strength “Phishing-resistant MFA”
Now, on to the PIM of it all
Before we assign the role, we’ve got to tweak the settings first. Still in Entra, Navigate to ID Governance > Privileged Identity Management > Microsoft Entra role, then click Settings under the Manage section, and click Global Administrator (you can use the search box to narrow it down)
Click Edit it the top-left corner.
In the Activation tab
I like to lower the duration to 4 hours, but you can decide what works best for your org.
On activation, require Microsoft Entra Conditional Access authentication context
Select the Passkey authentication context you created earlier
Require approval to activate
Select the Global Admin [Role] Security group you created earlier
You can leave the Assignment and Notification tabs alone for now, and click Update at the bottom.
Assign the role
Still in Entra, head to ID Governance > Privileged Identity Management > Microsoft Entra role, then click Roles under the Manage section, then click + Add assignments
Set Global Administrator for the role, and select the Global Admin [Role] group as member, and click Next.
You can keep the default “Permanently eligible” Assignment type; click Assign at the bottom.
This makes everyone in the “Global Admin [Role]” Security group eligible to Activate the Global Administrator role for up to 4 hours at a time - pending approval from another member of the group. Users cannot approve their own requests, so if you are a solo admin, skip the approval part of this configuration.
Here’s a breakdown of the activation approval flow:
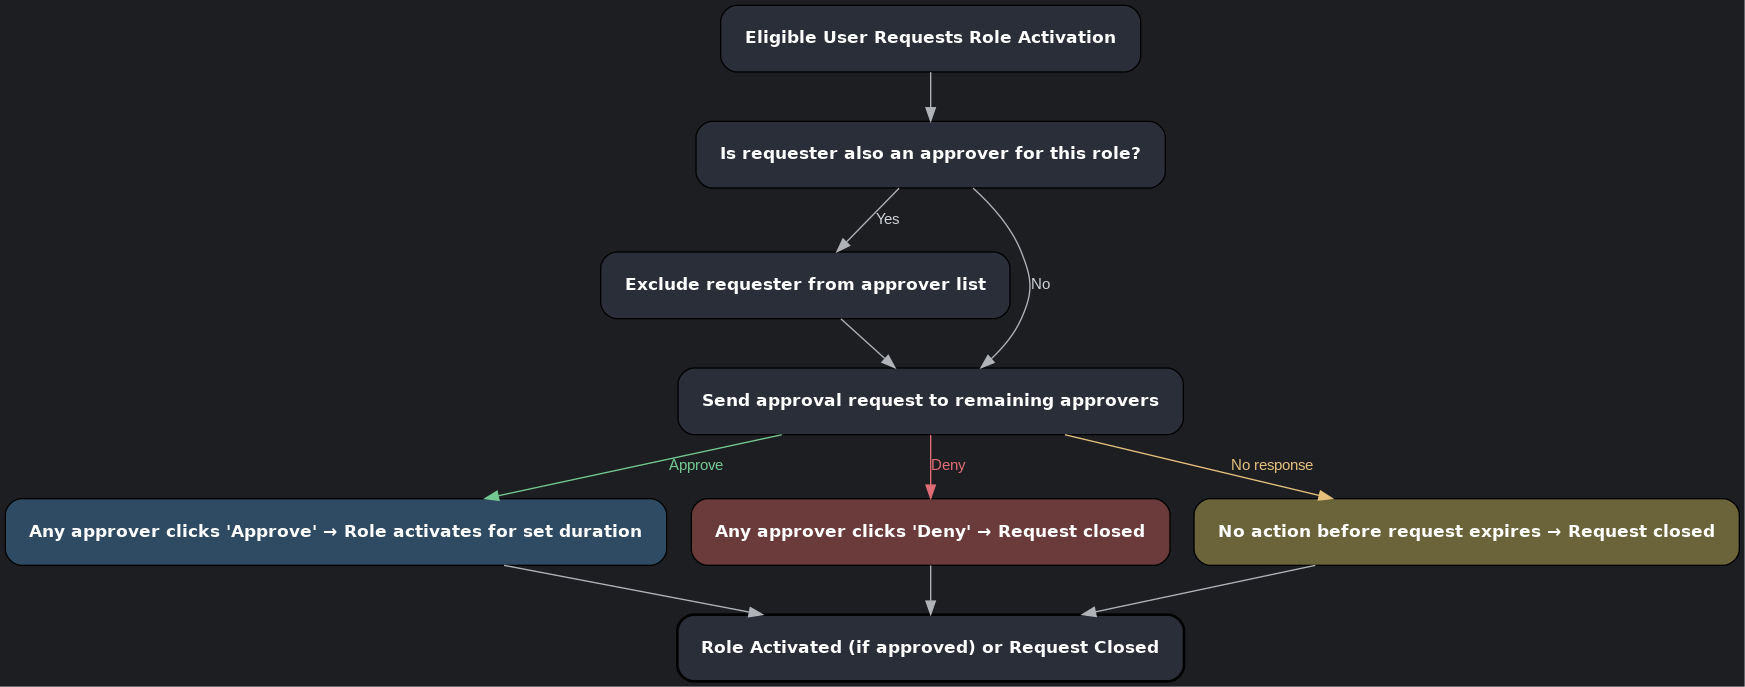
PIM Admin Approval Flow
Activating the role
Navigate to entra.Microsoft.com
Click Identity Governance > Privileged Identity Management > Activate
Click “Activate” on the Role you’d like to active.
Wrapping up
If you don’t already have one, now is a good time to make sure you have an emergency break-glass account set up. I’ll break it down in a future blog post, but for now you’ll have to rely on Microsoft’s documentation and recommendations: https://learn.microsoft.com/en-us/entra/identity/role-based-access-control/security-emergency-access
After confirming that all the necessary admins have been added to the “Global Admin [Role]” security group, you’re ready to remove their standing Global Administrator role. Just like when we assigned the role, head to ID Governance > Privileged Identity Management > Microsoft Entra role, then click Roles under the Manage section. Search for Global Administrator and click on it. click the Active assignments tab, and click Remove from all the necessary accounts.