
Managing Local Admin Rights on Entra-Joined Devices: 3 Practical Approaches
Let’s set the stage: Your organization is cloud first, Entra is your primary IdP, and you use Intune to manage your devices. You don’t want your users to have administrative privileges on their workstations, but you do need to retain those permissions for your service desk technicians.
I find that often in IT (and in life), there are often multiple ways to do the same thing. There are some advantages and drawbacks to each approach, but understanding them all can help you to form a strategy that makes sense for your organization’s needs and risk appetite.
There are purpose-built 3rd party PAM solutions (Privileged Access Management), as well as the paid Endpoint Privilege Management Intune Add-On. I’ll explore those in a future entry to this series, but in this post, I’m going to focus on some built-in options that you can leverage today.
Windows LAPS
Microsoft Entra Joined Device Local Administrator role
Directly add a user to the Local Administrator group
1. LAPS (Local Administrator Password Solution)
Arguably the most secure, and my preferred method, Windows LAPS is a built-in Microsoft solution that automatically rotates and stores unique local administrator passwords per device. With modern cloud support, it integrates directly with Intune and Entra ID.
How it works:
Each device gets a unique local admin password
Passwords are stored securely in Entra ID, and automatically rotated on a scheduled basis
Admins retrieve passwords on-demand through the Entra or Intune portal
Why it's great:
Extremely secure: no shared credentials
Easy to audit and manage
No need to manually manage local admin users
What to watch out for:
Password rotation may take up to 1 hour after policy assignment
Slight learning curve during initial setup
Best for:
Teams that want a secure, automated solution with auditability and don’t mind a little setup complexity.
Let’s run through an example configuration.
To get started, Sign in to the Microsoft Intune admin center and go to Endpoint security > Account protection, and then select Create Policy.
Configure the settings that make sense for your environment. Here’s an example of how I would configure it:
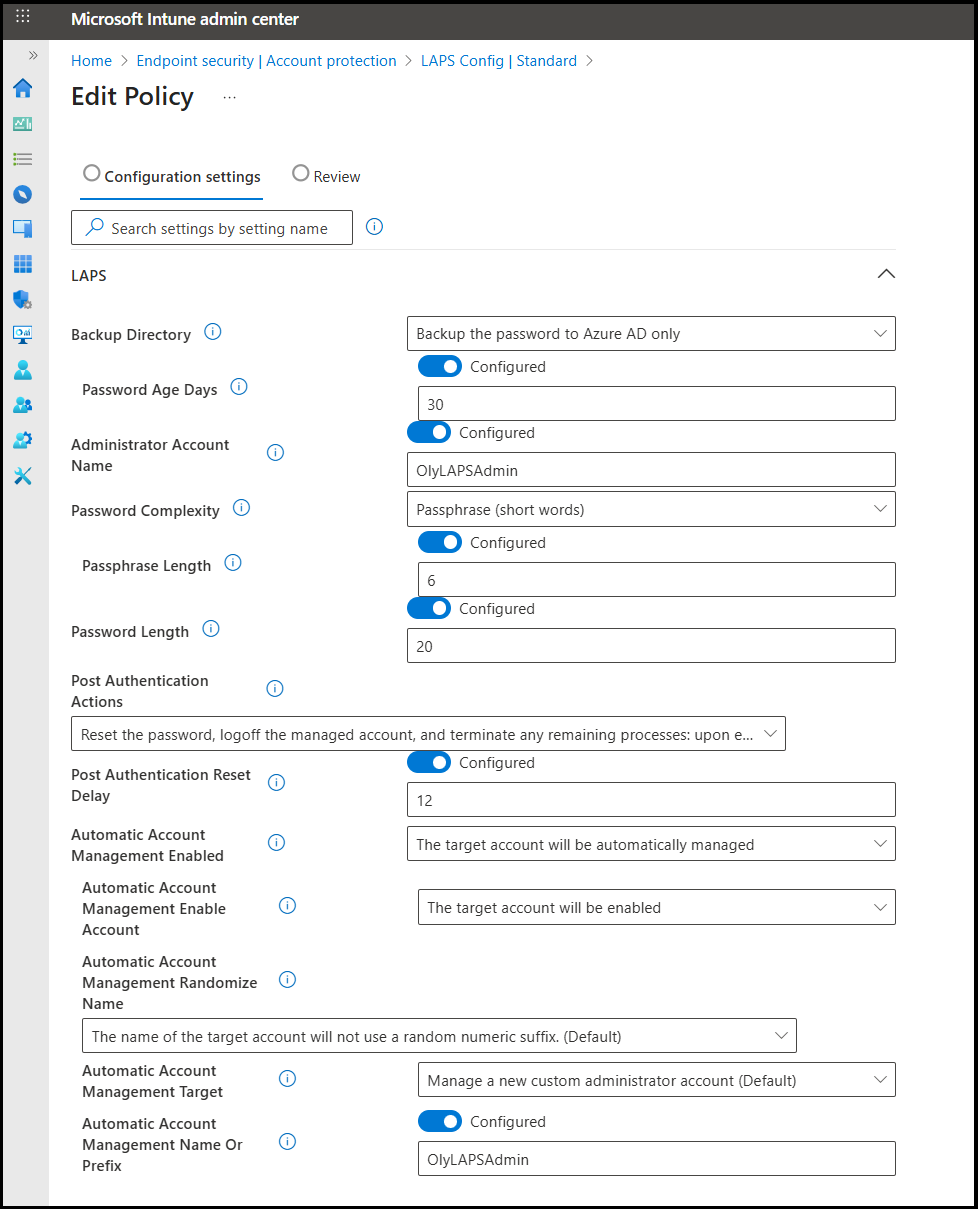
Let’s walk through exactly what’s going on:
This will create a new local account named “OlyLAPSAdmin” with membership in the Local Administrators group.
The password to this account will be automatically changed every 30 days.
When the OlyLAPSAdmin is signed into, within 12 hours:
The managed account password is reset, interactive sign-in sessions using the managed account are terminated, SMB sessions using the managed account are deleted, and any remaining processes running under the managed account identity are terminated.
That’s great, we’ve got it configured. But now what?
You can recover the password in 2 ways, through Entra or Intune.
Entra:
Devices > Local administrator password recovery > Show local administrator password

Intune:

Search for the device in Intune
Click Local admin password

The Security ID will be unique across devices, solving a common issue with shared local accounts being used for lateral movement.
The password is a string of 6 short words, and at least 20 characters
When entering the credentials, it will probably prompt you in the form of email address and password.
Since this is a local account, you’d need to use the computer name followed by a “\”. However, you can substitute a “.” for the computer name. For our example:
.\OlyLAPSAdmin
For more details about all the specifics, here is the official documentation:
Configure Policy Settings for Windows LAPS | Microsoft Learn
Get started with Windows LAPS and Windows Server Active Directory | Microsoft Learn
LAPS is great, but there are a lot of moving pieces and a few set up complexities to be aware of. It can take up to 1 hour for it to take effect, and sometimes you need to do some management on a new device more quickly than that.
2. Use the Entra Joined Device Local Administrator Role
What it is:
A built-in Microsoft Entra role that grants assigned users local admin rights on all Entra-joined devices.
How it works:
Assign a user or group to the role
That user becomes a local administrator on any Entra-joined device they sign in to
Why it's great:
Super simple to implement
Works instantly (no 1-hour delay like LAPS)
Managed centrally through Entra ID
Can use PIM to manage Just-in-Time privilege escalation
Requires Entra P2 license
Drawbacks:
It’s global: applies to all Entra-joined devices
Role assignments are tied to a cloud identity, so requires internet access
Shared accounts (e.g., one “Helpdesk Admin” account) undermine non-repudiation
Best for:
Smaller IT teams, solo admins, or organizations that need a lightweight and fast method—with the understanding that it should be properly controlled and audited.
If you are a small IT shop or need a quick solution, this could be an easy win. Simply apply the Entra role to the account that you want to be a local admin, and boom, done. As long as the device has Internet connectivity when you enter the credentials into the UAC prompt (or log into the desktop), any changes should take effect immediately. A quick way to get up and running if you’re in a bind.
Just because it can be that easy though, doesn’t mean that it should be that easy. Let’s look at some ways we can implement this a little bit more securely.
Here are some ideas to make it more secure:
If you have Entra P2 licenses, you should be using Privileged Access Management (PIM).
Nonrepudiation; Each technician should have their own service account, not a shared “DesktopAdmin@company.com” type of account.
Least privilege; if each tech needs their own individual account, it might make sense to just assign the role to their regular accounts, right? WRONG! Each tech should have a dedicated account; if this account gets compromised, the area of effect is reduced to local admin on devices, and doesn’t extent to Entra admin roles for example.
In a hypothetical attack, the threat actor could use the compromised credentials to log into Entra, where they could then move laterally through the tenant and establish persistence.
Use Conditional Access to restrict authentication to the account unless a Passkey is used.
Alternatively, if you are using PIM, require the Passkey for role elevation. Or both ¯\_(ツ)_/¯
On to the configuration
First, create a dedicated role-assignable group, and any admins or service desk technicians. Don’t assign any roles yet, we’ll do that in the next step using PIM. (If you’re not going to be utilizing PIM, you can go ahead and assign the role here)

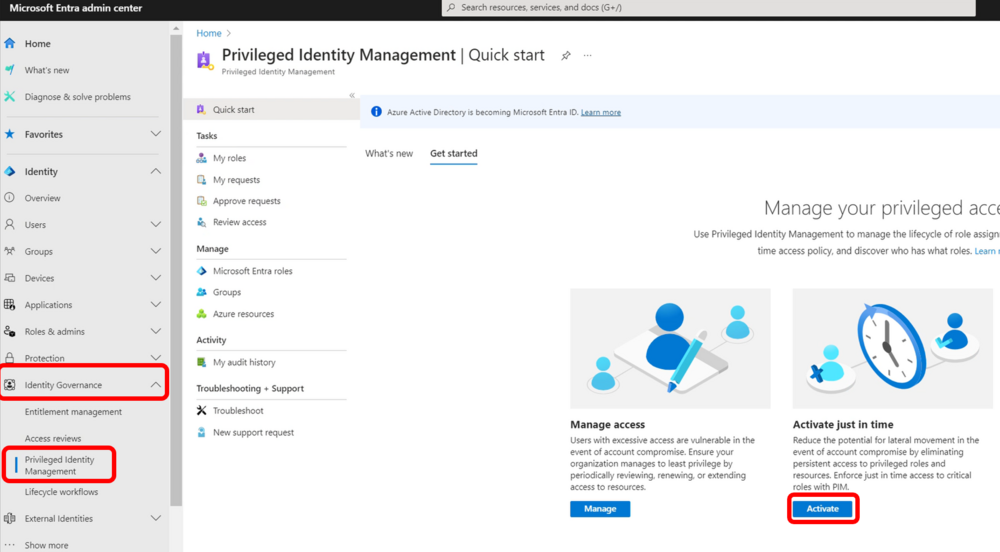
Next, navigate to Entra > ID Governance > Privileged Identity Management > then Manage Microsoft Entra roles

Search for Microsoft Entra Joined Device Local Administrator > Add assignment
Select the group you just made, and assign it as Permanently Eligible


Members of this group can now activate the role to effectively become Local Admin on any Entra Joined device.
3. Assign a Specific User as Local Admin (Autopilot or Manual)
There aren’t many situations where the first two options (Entra role or LAPS) won’t meet your org’s needs. But maybe you have power users, developers, or IT staff who frequently need to install or test software and can't reasonably rely on the Service Desk every time. Or maybe you have a set of lab or test devices that aren’t connected to your production environment. In these cases, it may make sense to assign a specific user as a local admin.
Ideally, you’d be using a Privileged Access Management (PAM) solution to handle these scenarios with time-bound elevation and audit controls. But for a short-term or cost-free approach, there are ways to implement this more securely — with the same guiding principle in mind: the end-user’s primary sign-in account should not have permanent admin rights.
Local User Approach
Instead, create a secondary, dedicated local admin account that is unique per device or per user. This can be done using a PowerShell script, and deployed:
Via Autopilot provisioning packages or scripts
Manually (e.g., in-office setup)
Through RMM tools if the device is already deployed
Key Considerations:
The account should have a strong, complex password — adhere to local password policy requirements or manage credentials using LAPS if possible.
Ensure User Account Control (UAC) settings are configured to:
Prompt for credentials (not just a "Yes" button)
Prompt every time elevation is requested — avoid “auto-approve” settings
Avoid using the same username/password across devices to prevent lateral movement.
Do not add the user’s primary Entra ID account to the Administrators group — this undermines the entire security model.
Before rolling this out widely, consider the difficulty of revoking access later. If you remove the script or unassign the configuration profile in Intune or Entra, it won’t automatically clean up the local admin group on already-provisioned devices. You’ll likely need to deploy another script to remove access — which means tracking where it was applied becomes critical.
For this reason, treat this method as an exception-based solution, not the default.
Wrapping up
At the end of the day, the goal is straightforward: empower users to do their jobs while keeping company assets and data secure.
Achieving that goal, however, is rarely simple. It requires balancing usability with security, evaluating the threats your organization faces, and considering your unique risk tolerance, legal obligations, and compliance requirements.
Hopefully, the information shared here helps you make more informed decisions as you define your path forward.